Trying to kick back and watch the latest viral videos on your laptop but looking at a slideshow instead of smooth HD video? If you are anything like us then the site of a buffering video probably makes your blood boil. Streaming videos over WiFi can be extremely frustrating. But it doesn’t have to be! In this guide, we’ll look at how you can speed up WiFi for streaming of your favorite videos and shows.
The simple answer and likely not what you want to hear is: Use a wired network connection with your streaming service (Check out our recommended services). Connections over a cable perform much better in terms of speed and stability. However, that is not always possible. After all, who wants to run a cable through the living room or down the hallway to the bedroom? Follow these 9 easy steps to put an end to buffering and stuttering videos once and for all.

#1. Find the Weakest Link
 Before you go and reconfigure or replace your router you should first find the culprit that is slowing you down. Maybe it’s not your WiFi that is causing you issues. Any internet content usually runs through dozens of interconnected devices that make up the end-to-end connection from a server to your end device.
For the purpose of finding the weakest link of a slow stream we can distinguish between three different stages:
- The server that is providing the streaming content
- Your home’s internet connection to your Internet Service Provider (ISP)
- The WiFi connection from your router to your devices
The overall speed of a stream is determined by whatever the slowest connection between these three stages is. Therefore, in order to eliminate buffering and stuttering video playback, you need to find and fix the weakest link in the connection.
The Streaming Server
All your streaming content comes from a remote server. The content is delivered from here through various intermediaries to your ISP and eventually to your doorstep (i.e. your home router). The speed of this process is primarily determined by the bandwidth of the server (how much data can be pushed out per second) and the distance the content has to travel (how much distance that data has to travel to reach you). Whatever happens at the streaming server is out of your control. As is everything between the server and your ISP.
Most premium streaming services, such as YouTube, Hulu or Netflix have huge bandwidth at their disposal and special agreements with ISPs to fast-track their content. They are also able to stream to users from multiple servers, minimizing the distance the data has to travel.
Another factor to consider is how much data is being sent. HD content with low compression requires a much faster connection than content with lower bitrates.
How to Diagnose
 In order to check whether the streaming server is causing bad video playback, simply test your connection to other streaming services. Hop on to YouTube and watch an HD video. Make sure that at the bottom right of the video a red “HD” logo is visible. Is that stream buttery smooth? Well, looks like we found the problem and there isn’t anything wrong with your WiFi after all.
How to Fix
To be honest, there is not a whole lot that you can do if the remote server is the source of your buffering issues. Either switch to a premium streaming service that is able to cope with the demanding bandwidth requirements of video streams. Or you can opt to lower the video quality, for example switching from 1080p to 720p resolution, if available from the stream provider.
Your Internet Connection
Similar to the streaming server, your home router has a limited bandwidth assigned by your ISP for sending and receiving data from the internet (i.e. your connection’s “speed”). Do note that the bandwidth that you sign up for is more of a theoretical value and not actually what you get.
How to Diagnose
The easiest way to get your connection’s true speed is to use the free service SpeedTest.net. Important: Use a device connected to your home router via cable. This gives you your connection’s actual speed, independent of your WiFi’s performance. Simply click on Begin Test to get the actual upload and download speed to a nearby server. For the purpose of streaming, the download speed is what you should be looking at. Keep in mind though that SpeedTest measures the connection to servers that are close to your location. The connection speed to the server that you intend to stream from may be slower.

You will be presented with a results page similar to the one above. The download speed is what determines how much data you are able to receive over your internet connection. Compare these numbers with the requirements for different stream qualities below to determine if your connection can handle them. Also, be sure to be well above the requirements as the distance to the server may degrade your download speed.
Typical bandwidth requirements for different video stream qualities:
- 480p – 3 Mbps
- 720p – 5 Mbps
- 1080p – 8 Mbps
- 4k – 25 Mbps
You may also want to run multiple tests on speedtest.net, comparing the speeds when other devices are connected to your home network and shutting them down or disconnecting them from your router. This allows you to see if your bandwidth is being used by other devices, possibly resulting in bad video playback.
How to Fix
In case your connection speed is not well above the requirements for your desired stream, you may want to look at upgrading your current connection with your ISP. This will give your download speed a good boost. Also, you may want to have a look at the tips on enabling QoS and security precautions below, as these can also have a positive impact on wired connections too. Finally, lowering the stream quality also reduces the bandwidth required for smooth playback.
You can also use Speedify bonding VPN to combine your internet with another connection, like a public WiFi nearby, a cellular connection or a tethered phone.
If your download speed comfortably exceeds the bandwidth requirements of the type of video stream you are having issues with, the most likely culprit for choppy video playback is…
You Wireless Connection
We have a love-hate relationship with WiFi networks. We love them for their convenience, accessibility, and flexibility. However, we absolutely hate them for their mediocre reliability, connection quality, and speed.
Android TV Box Bestsellers
We will not go into any details on how they work. But essentially data is transmitted over the air on certain frequencies. As with any wireless transmission, there are various sources of interference that impact the connection quality and therefore its speed. Additionally, physical obstructions also impact the connection speed. Also, the signal range is limited and dependent on the transmission power of both the sending and receiving devices.
Finally, there are different wireless protocols that WiFi routers support that have different maximum transmission speeds. What protocols your router supports is mostly determined by its age. See below the maximum theoretical wireless speeds per protocol:
- 802.11b – 8 Mbps
- 802.11a/g – 54 Mbps
- 802.11n – 300 Mbps
- 802.11ac – 1 Gbps (1000 Mbps)
The actual speed that you will experience in reality is much lower. However, the higher the theoretical speeds the faster your actual connection will be. Also, some routers use advanced transmission technologies which allow them to exceed the numbers listed above.
How to Diagnose
To confirm that your WiFi is the weakest link when streaming, and at this point it certainly is, run another SpeedTest.net test. This time though use your device that is connected via your wireless router. See any significant drop in download speed? Well, we found the problem. Even more so if the reduced download speed gets you dangerously close to the bandwidth that is required for your stream, e.g. 10 Mbps for HD content.
How to Fix
The good news is, there are a lot more things you can do to improve your WiFi connection as opposed to issues with the streaming server or your ISP connection. Follow the steps below to speed up your WiFi for streaming and say goodbye to buffering videos.
#2. Enable and Connect to 5Ghz Band
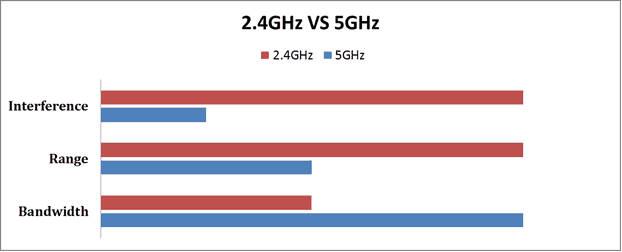
More recent wireless routers allow you to activate a second band on top of the 2.4 GHz band that has been used for many years. This has two advantages:
- The 5Ghz band experiences a lot less noise than the crowded 2.4Ghz spectrum. Bluetooth, microwaves and many wireless devices such as keyboards and mice all broadcast over 2.4 Ghz. Your WiFi signal, therefore, competes with all of these devices resulting in bad signal reception and reduced speed. By using the 5Ghz band you are sharing the over-the-air data highway with fewer other devices. Additionally, 2.4Ghz wireless networks are more common, adding to wireless congestion.
- Devices transmit data much faster on the 5Ghz frequencies. It has 23 non-overlapping channels vs. only 3 in the 2.4 GHz band. Also, many transmission technologies aimed at increasing data throughput are only available on the 5Ghz band.
However, there is one major downside to using the higher frequency band. Its range is shorter than 2.4Ghz signals and is unable to penetrate solid objects nearly as well. More recent routers, however, are able to mitigate this to some degree using advanced features such as beamforming.

Assuming signal strength is not going to be an issue, using the higher frequency results in a significant boost to your connection speed. To enable the 5Ghz band on your router, you need to connect to its control panel, in many cases reachable via your browser at http://192.168.1.1. Visit your router manufacturer’s website for detailed instructions for your specific model.
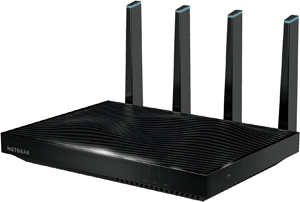
As mentioned before, only newer models provide 5 Ghz support. In case your wireless router does not allow you to make use of the higher band, consider upgrading your router to one of the latest models that guarantee better signal coverage and higher speeds. We highly recommend the for its blazing transmission speeds and signal coverage. A cheaper yet still very capable alternative is the .
#3. Change Your WiFi Channel
Your WiFi channel is closely related to the band your router uses. Each band consists of multiple channels within its frequency. A wireless router does not use all of these channels. It actually uses a specific channel, which may overlap with other nearby channels in the spectrum.

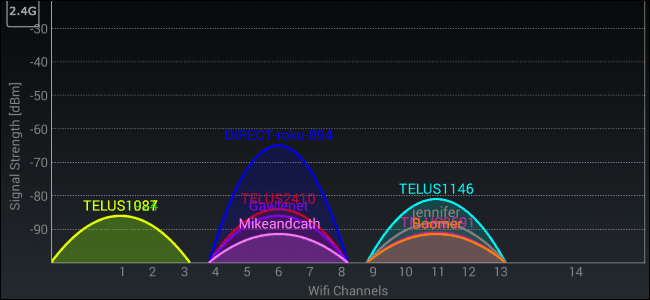
The problem is, when many wireless networks use the same channel or channels that are close to each other, the signal degrades due to interference. Take a look at the screenshot above of all the networks broadcasting on the 2.4 Ghz band. Channels 6 and 11 are full of competing wireless networks, ultimately slowing each other down. Wireless network Telus1087, on the other hand, is using channel 1 exclusively and therefore has to cope with much less interference than all the other WiFi signals around it.
 Unless you live a solitary life completely disconnected from the rest of the world, interference from other networks is going to be a big problem.
The easiest way to analyze how busy the different channels are is to use the free Android app Wifi Analyzer. Simply install and once you run the app you will see what networks broadcast on which channels. Now look for a channel that is relatively quiet and write it down. Next, you need to launch your router’s administration interface and change the channel for your WiFi network. Consult your router’s instructions or visit the manufacturer’s website for detailed instructions.
#4. Optimize Your WiFi Signal
So you’ve tried switching to 5Ghz and switching to a less crowded channel but still facing stuttering videos? Try these 3 tips to improve signal strength:
- Router placement: No one likes the sight of a blinking wireless router. However, tucking it away in a cabinet may have a big impact on signal strength. When finding the perfect spot for your router, keep in mind that walls and other obstructions weaken coverage significantly. Also, other devices such as microwaves and other electric appliances create interference that slows down your WiFi network. Ideally, place your router in an elevated open space to maximize coverage.
- Antenna positioning: Ensure your router’s external antennas are unobstructed and orient them vertically.
- Replace antennas: Adding an external antenna to a wireless router that only uses internal ones is another great and cost-effective way to bump up WiFi coverage. Look for “high-gain” external antennas and consider getting a directional one This allows you to aim the signal at your actual weak spots.
#5. Enable QoS & WMM
All devices that connect to the internet through your router are continuously battling for bandwidth. One device might be browsing the web, the other streaming videos on YouTube and a third downloading software. All of these are allowed the same bandwidth (a third of the network’s total bandwidth) despite having very differing requirements. A slower download will have less of an impact than a slower stream resulting in buffering.
Many wireless routers allow you to use features that prioritize the transmission of certain content types over others. The more basic QoS (Quality of Service) is usually configured manually. We won’t cover how you go about configuring QoS to optimize video streaming due to different implementations in most routers.
Luckily, routers have implemented a standard called WMM (Wi-Fi Multimedia). It is designed to improve audio, video and voice data over wireless networks. Many users experience buffer-free video streaming on previously problematic wireless networks using WMM. You should definitely give this a try. Check your router’s documentation for instructions for your specific model.
#6. Extend Your Signal Range
Even the best router’s signal range is limited. You might live in a palace or your router’s signal has to overcome many walls. Whatever the reason, your signal is too weak and your WiFi speed is adversely impacted. In this case, you have the option to place a wireless range extender between your network’s weak spot and the WiFi router. Sometimes these are also known as wireless repeaters or WiFi expanders. These devices act as intermediaries, passing on the data transmission by rebroadcasting the WiFi signal and boosting wireless coverage.
You can pick up any range extender brand, regardless of what make your router is. However, do ensure that you get one that is capable of broadcasting the same signal, i.e. do not add a 802.11n extender to a network using 802.11ac. A popular choice is the , which looks very similar to a normal wireless router. A hugely popular alternative that plugs directly into your power outlet is the .
#7. Upgrade Your Router
As a rule of thumb, you should upgrade your router every couple of years. Manufacturers invest a lot of time and money to increase the performance and add new features to WiFi routers due to their popularity. The whole industry continuously works on and implements new standards for all WiFi devices to address common issues and downfalls of wireless data transmission. Your new phone might already support these new technologies but is unable to benefit from them as your router is outdated.
 When looking to upgrade to a new router, make sure you pick one that meets these requirements:
- Dual-band support, i.e. able to broadcast on both 2.4Ghz and 5Ghz frequencies
- 802.11ac compatibility
- WMM support to prioritize demanding applications
- Strong signal output and coverage by utilizing new technologies such as beamforming
We recommend that you consider the or . Both of these devices reach the top spots in most WiFI benchmarks. More options available in our roundup of the best Wifi routers for streaming!
#8. Up Your Security
Finally, another thing that you should always consider, regardless of bad WiFi reception or choppy video playback, is security. Unknown to you, there might be more devices or applications using your WiFi connection than you thought.
Always protect your wireless network with a strong password using WPA-PSK. Networks using WEP password encryption are easily broken into. Not only can others use up a good chunk of your bandwidth when your network is not secure. They can also eavesdrop on your communication and sniff out passwords to websites. Don’t take any risk here and choose a password that is long and difficult to guess.
Also, install premium anti-virus software to keep others off your devices. You don’t want your home internet connection to end up being part of a botnet that is used to carry out attacks against remote targets. If your network is experiencing inexplicably slow speed and you tried all other steps outlined in this post, do a deep scan of all your devices to ensure no viruses or other types of malware are using your bandwidth for illegal purposes.
#9. Lower Stream Quality
This is the point where you concede defeat. You tried everything and there might simply be factors outside of your power that slow your streams down. You have two final options before giving up on that sweet HD video content:
- Reconsider running a wired connection from your device to your router
- Buy a pair of powerline network adapters
Powerline adapters are small devices that plug into your power outlet and use your power wiring as a means to transport data. They are not without their flaws but certainly beat wireless networks with respect to connection stability and reliability. A personal recommendation would be the . It is virtually plug-n-play and performs well for us.
Last but not least, if all else fails, you will have no choice but to lower the required bandwidth of your stream. Change from Full HD to 720p or switch to an alternate streaming service with higher compression to reduce the strain that streaming puts on your home network.
Other Things You Can Try
- Update your router’s firmware: Manufacturers constantly release software improvements to their existing router models to get rid of bugs and improve overall performance. Don’t expect huge gains, but you might just get lucky.
- Reboot your modem and router: Sometimes troubleshooting is as easy as rebooting your device to free up cache and clear up issues with its performance.
Do you have any other tips to speed up WiFi for streaming? Or did you experience choppy video playback but one of these steps fixed your issues? Let us know in the comments below!
Last update on 2026-02-14 at 19:44 / Affiliate links / Images from Amazon Product Advertising API. As an Amazon Associate I earn from qualifying purchases.